Saturday, September 28, 2013

Purple Tops and Purple Buttons

QuiltyCat's color choices unified her sampler blocks. Note the different
shades of green and violet in the cornerstones: scrappy yet tied together.

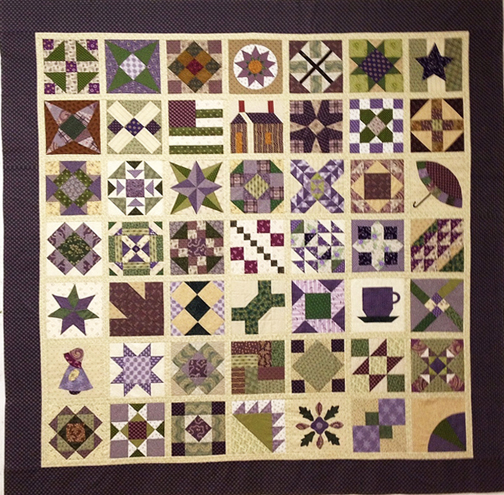
Many of you put your blocks together with purple sashings and borders, using the symbolic colors of the English suffragettes, who used a variety of names and a variety of purples. Their consistent emphasis on 
violet, green and white communicated their message and their identity as the most radical of the British groups.


Cookie's Creek sashed with a purple print,
the background of her sunflower block in the center.


Beryl used many purple shades in the sashing cornerstone squares.


Karen in Tucson (1 of 3 tops)
She's framed a variety of violets with a bright purple inner border.


Susan at Stitching Witch
Purples pushed almost to grays. She also used grayed vintage photos.

Scroll down to recent posts to see how other quilters used a range of violets.

And see a post I did on Marci H's blocks here:


Saturday, September 21, 2013

Voilà les 49 blocs assemblés


Voilà les 49 blocs assemblés par Anne Marie
[There you have it! The 49 blocs assembled by Anne Marie.]

My college French remains trés mauvais (very bad) but I can still read a little and I am having a good time trying to translate our French followers' captions on finished quilts.

Blocks sont assemblé par Claudine
[Blocks finished by Claudine.]

C'est magnifique!
[Loose translation: I luv 'em.]

Blogger tells you everyday where your audience lives.
I recolored their map to show where the Grandmother's Choice
readers are.
The darkest blue-green is in the U.S., next is France, then Canada and Australia.

C'est magnifique!

Sorry to all the French readers for the execrable French.

Saturday, September 14, 2013

Variations on the Theme

4 Kansas Sunflower
FranceA at PassionPatchwork

 If you read our Flickr page you'll have noticed this set of rectangular blocks by FranceA

43 Star of Hope
She's redrafting the patterns to rectangles and adding a few buttons.

45 Aunt Mary's Favorite
I love the vintage look in her purples.


She says she likes to draw, so she is doing the redrafting by hand.

Kathie at Magpie Memories
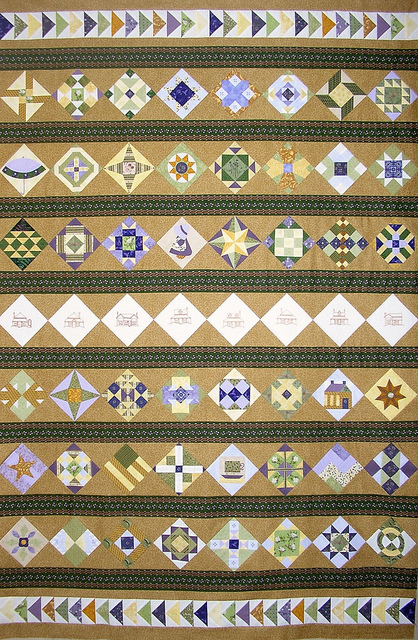
has assembled her top as a strip quilt for a wall hanging.

with a strip of embroidered blocks of Australian houses.
These are 4" Blocks!

Deafmantim has done two tops,
one in the gold of the American colors of yellow and white.

And one adding the purple and greens.
There are words appliqued in the border here,
"Votes For Women" at the top...

You blog- followers have really outdone yourselves in coming up with ideas to individualize these blocks. Thank you very much. I will have fun posting more variations in the weeks to come. 


Saturday, September 7, 2013

Virtual Quilt Show

Grandmother's Choice by
ConnieB_CA

You may have noticed Connie's blocks over the past year...

Masterful fussy cutting of William Morris reproductions...

in a lovely madder and indigo color scheme.

No matter what I threw at her she had a solution.

Terrific, Connie.

She set 49 blocks in the same set Becky used for
the Civil War Sampler last year.

Somebody suggested we need to have a quilt show.
That would be terrific but until we can figure out
how to pay for all that international shipping,
the virtual show will have to do.

And do quite nicely.
Go to our Flickr page where Dustin keeps things going.

I noticed today that we have over 300 members
who have posted about 4,000 photos.

Now that's a quilt show!

I've been lurking around the site, uploading some finished tops.
Squaring them up a little
Grandmother's Choice 
By Barbara B (another one, not me!)

74" square with narrow sashing. 
(She didn't like her block 48 so she invented her own).


BB wants to know: "Any thoughts on quilting designs for these quilts?"
I'll have to think on that. Some imagery from the posters, buttons and graphics perhaps?


Pink Deenster has been using a fresh color scheme of turquoise and black
and red with lots of plaids and pattern.

Pink Deenster
Here's her set.

Pati did a second set in red, white and blue for a See How We Sew post.


You are all so inspirational I am going to have to think of another sampler.
Becky and I are planning a 2014 block of the month for the Civil War Quilts site beginning in January
but a block of the week is too much fun!

I'll think about it - history and patterns.
I enjoy writing it and love seeing the results.

Saturday, August 31, 2013

Dustin's Top

What has Dustin been up to???
You certainly have noticed his blocks over the past year.
Is there method in his madness?


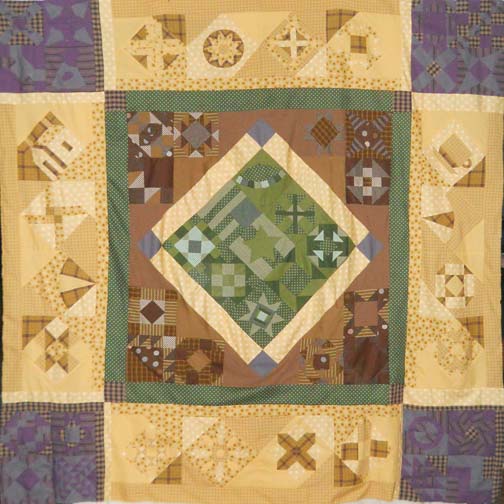
When he volunteered to be a block tester he sent me this color sketch
for a medallion set. Good colors, I said, integrating three important symbolics shades
in the women's rights movement:
Purple, green and yellow.

But I still had little clue as to what was going on.


Then he sent this:
The Center.
Ooooh. All the greens together.

And all the purples together.....


Voila!

Very, very nice.
Very innovative.
Very Dustin.

Saturday, August 24, 2013

Vicki Welsh Has Finished Two Tops

Jackie's Choice
by Vicki Welsh


29 Australia Star by Vicki Welsh

You may have noticed Vicki's blocks on our Flickr page. She's been making two sets. Because today is Vicki Welsh day on two of my blogs she was motivated to finish the tops she's been working on.

"Through the process I also figured out the names. While working on them I figured out that each one really reflected the personality of my grandmothers. The symmetry one will be called Jackie's Choice and the shibori one will be called Lura's Choice."  

Jackie's Choice in progress


38 Nonsense


Vicki loves to play with the fabric, cutting this set in kaleidoscope design inspired by Paula Nadelstern classes.

Brick Pavement


EQ7 Sketch of the set for a wall quilt of 30 blocks.


Vicki wrote:
"This is the layout for the symmetry version. The cornerstones will be quarter-square triangle kaleidoscope blocks. The brown in the EQ sketch is actually a black fabric with brown and steel blue dots. I think it will create a nice transition from the blocks to the hand-dyed black background."

To read more see Vicki's blog here. Scroll down to read the post:

Some  other web sites for Vicki:
Flickr Photostream:
http://www.flickr.com/photos/10967488@N06/with/8768063805/
Shop: https://www.etsy.com/shop/vickiwelsh?ref=si_shop

Saturday, August 17, 2013

Becky's Purple Grandmother's Choice

Becky Brown
Grandmother's Choice Sampler 2012-13
84" x 84" Finished Size
49 eight-inch finished blocks

For an encore this week we show you Becky's second version of the 49-block Grandmother's Choice sampler. This is the purple version. (The purple quilt has green sashing and the green quilt has purplish plum sashing--it can be confusing.)

She liked that appliqued Heroine's Crown block so much she put it in the center
and framed it with four different-colored cornerstones.
(Some people love to applique!)

Here is her original color card which she took with her when she looked for fabrics
(either in her stash or the shops). 

35 Granny's Choice

She writes:
"My fabrics for this quilt were more limited than with the Pink & Green quilt, so fabric selection seemed more challenging, however, my friend Vicki Welsh (vickiwelsh.typepad.com)  gave me a stack of her custom hand-dyed fabrics in a wide range of green and purple and they were a perfect compliment to my other fabrics. I used her fabrics through out the quilt. Vicki also sewed along with us each week, making two quilt spectacular quilts."

 (I'll show you Vicki's next week.)

27 Grandmother's Dream

Becky also did a lot of fussy cutting.

We have a completely different set on this one with bright stars pieced into the sashing.
Instructions below.

But after figuring this out as a pattern I have to tell you it is not a beginner set for three reasons:
1---there is a lot of piecing in it.
2 ---there are a lot of seams that need to be matched. You can't let the star points get off, so they must be very accurate and you need to do a lot of pinning in the sashing and border.
3---Both dark prints in the sashing strips and border are stripes, so you have to worry about directionality all the time. Becky says: "Keeping the directional fabrics going the right direction in this quilt wasn't really all that difficult."

If you love to machine piece and you are a confident stitcher with intermediate skills---You can do it!


SETTING THE BLOCKS
  • 49 blocks finishing to 8"
  • Sashing strips and corner stones finishing to 2" 


The field of sashed blocks at this point finishes to 72 1/2" square (with seams).
For the sashing Becky used both green and navy prints.
The green is from my Civil War Jubilee collection (in shops now in summer 2013)

"Celebration" (#8252-14) in Challis Green---
a dark green with black.
      
Here's her navy print, a star and stripe.

Says Becky:  "It is Old Glory Gathering by Primitive Gatherings for Moda."  

For her white she used a subtle white on white print.

The pattern here gives you instructions for sashing pieced of one dark print and one light. The sewing and cutting instructions are for a stitch-and-then-cut method.

Fabric & Cutting:
For the light stars you need 2-1/4 yards of a white-on-white print.
Light Cornerstones: Cut 64 cornerstones 2-1/2" square.
Light Star Points: You cut these as squares and slice them into triangles after you piece (see Stitching below.) 
     Cut 448 squares 1-7/8"  x 1-7/8" (You need 8 for each of the 64 stars.)
Dark Strips: Cut 112 sashing strips 2-1/2" x 8-1/2" = This is the border fabric too and because it's directional I'd guess you need 3-1/2 yards of fabric 

Stitching the Sashing:


The sashing units finish to 8" rectangles.
Begin by placing a light square in the corner of the rectangle face to face as shown below.
Then stitch from corner to corner right on the diagonal.


If you have trouble stitching a straight diagonal at first you might want to mark the back of each white square with a diagonal pencil line. (You'll get real good at sewing diagonals after 448 corners.)

Leaving the pieces face-to-face cut a quarter inch OUTSIDE the stitching line through 2 layers.

Discard those pieces.

Press open and repeat in all four corners of each strip.

You need  112.

Create horizontal strips by alternating blocks and strips.
Make strips of 7 blocks ending on either side with a sashing strip.

Repeat this to make 7 strips of blocks.

For the sashing between the block strips piece the cornerstone squares between the pieced sashing strips.
Piece 7 strips and 8 cornerstones ending with corner stones on either side.
You need 8 of these strips.
Set the horizontal block strips between the sashing strips.


Notice that extending the sashing to the edge creates partial stars, a composition that's a little unsettling.

Here's how Becky finished the stars out into the border using a pieced border.
6" Finished border

The border is completely pieced of alternating rectangles.


The yellow lines here are seam lines. 


A finishes to 6" tall by 8" wide
B finishes to 2" tall by 6" wide 

From the same dark fabric as the sashing: 
A - Cut 28 rectangles 6-1/2" x 8-1/2"
B - Cut 32 rectangles 6-1/2" x 2-1/2"
      (Do notice that this fabric is directional; it has pinstripes. Keep your eye on the direction of the stripe as           you cut.)
C - You already have cut these star points as squares. You need 64.
D - Is the border corner squares, finishing to 6" square. Cut 4 of these from the dark fabric 6-1/2" x 6-1/2"

Stitching the Border
Add the C pieces to the B rectangles as you did in the sashing by stitching then cutting as shown above. You need only two C triangles for each of the B's.


Make 32 of these border units B.
For the  left side border join 7 rectangles A
alternating with 8 border units B.
The star points B go one either end.


The side borders should measure 72-1/2" long by 6-1/2" wide with seams.
Do the same thing for the right side.

Add the side borders to finish out the stars.

For the top border stitch a strip 
that begins and ends with a D square
and alternates 8 B units with 7 A rectangles.


This strip should measure 84-1/2" with seams.

Repeat for the bottom border.

Add the top and bottom borders .

And give yourself a pat on the back.