

Becky Brown
Grandmother's Choice
Sampler 2012-13
84" x 84" Finished Size
49 eight-inch finished
blocks
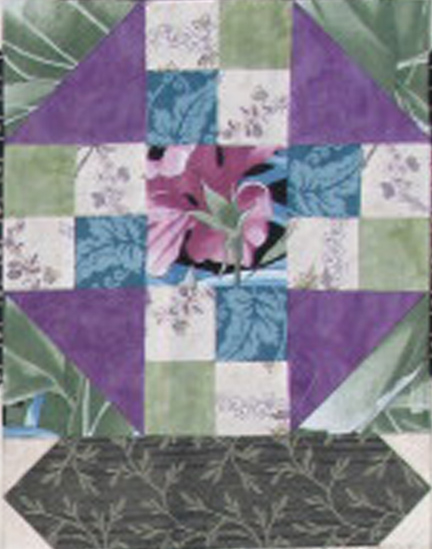
For an encore this week we show you Becky's second version of the 49-block Grandmother's Choice sampler. This is the purple version. (The purple quilt has green sashing and the green quilt has purplish plum sashing--it can be confusing.)

She liked that appliqued Heroine's Crown block so much she put it in the center
and framed it with four different-colored cornerstones.
(Some people love to applique!)

Here is her original color card which she took with her when she looked for fabrics
(either in her stash or the shops).

35 Granny's Choice
She writes:
"My fabrics for this quilt were more limited than with the Pink & Green quilt, so fabric selection seemed more challenging, however, my friend Vicki Welsh (vickiwelsh.typepad.com) gave me a stack of her custom hand-dyed fabrics in a wide range of green and purple and they were a perfect compliment to my other fabrics. I used her fabrics through out the quilt. Vicki also sewed along with us each week, making two quilt spectacular quilts."
(I'll show you Vicki's next week.)

27 Grandmother's Dream
Becky also did a lot of fussy cutting.
We have a completely different set on this one with bright stars pieced into the sashing.
Instructions below.
But after figuring this out as a pattern I have to tell you it is not a beginner set for three reasons:
1---there is a lot of piecing in it.
2 ---there are a lot of seams that need to be matched. You can't let the star points get off, so they must be very accurate and you need to do a lot of pinning in the sashing and border.
3---Both dark prints in the sashing strips and border are stripes, so you have to worry about directionality all the time. Becky says: "Keeping the directional fabrics going the right direction in this quilt wasn't really all that difficult."
If you love to machine piece and you are a confident stitcher with intermediate skills---You can do it!

SETTING THE BLOCKS
- 49 blocks finishing to 8"
- Sashing strips and corner stones finishing to 2"

The field of sashed blocks at this
point finishes to 72 1/2" square (with seams).
For the sashing Becky used both green and navy prints.
The green is from my Civil War Jubilee collection (in shops now in summer 2013)

"Celebration" (#8252-14) in Challis Green---
a dark green with black.

Here's her navy print, a star and stripe.
Says Becky: "It is Old Glory Gathering by Primitive Gatherings for Moda."
For her white she used a subtle white on white print.
The pattern here gives you instructions for sashing pieced of one dark print and one light. The sewing and cutting instructions are for a stitch-and-then-cut method.
Fabric & Cutting:
For the light stars you need 2-1/4 yards of a white-on-white print.
Light Cornerstones: Cut 64 cornerstones 2-1/2" square.
Light Star Points: You cut these as squares and slice them into triangles after you piece (see Stitching below.)
Cut 448 squares 1-7/8" x 1-7/8" (You need 8 for each of the 64 stars.)
Dark Strips: Cut 112 sashing strips 2-1/2" x 8-1/2" = This is the border fabric too and because it's directional I'd guess you need 3-1/2 yards of fabric
Stitching the Sashing:

The sashing units finish to 8" rectangles.
Begin by placing a light square in the corner of the rectangle face to face as shown below.
Then stitch from corner to corner right on the diagonal.

If you have trouble stitching a straight diagonal at first you might want to mark the back of each white square with a diagonal pencil line. (You'll get real good at sewing diagonals after 448 corners.)

Leaving the pieces face-to-face cut a quarter inch OUTSIDE the stitching line through 2 layers.

Discard those pieces.

Press open and repeat in all four corners of each strip.

You need 112.

Create horizontal strips by alternating blocks and strips.
Make strips of 7 blocks ending on either side with a sashing strip.
Repeat this to make 7 strips of blocks.
For the sashing between the block strips piece the cornerstone squares between the pieced sashing strips.
Piece 7 strips and 8 cornerstones ending with corner stones on either side.
You need 8 of these strips.
Set the horizontal block strips between the sashing strips.

Notice that extending the sashing to the edge creates partial stars, a composition that's a little unsettling.
Here's how Becky finished the stars out into the border using a pieced border.
6" Finished border
The border is completely pieced of alternating rectangles.

The yellow lines here are seam lines.


A finishes to 6" tall by 8" wide
B finishes to 2" tall by 6" wide
From the same dark fabric as the sashing:
A - Cut 28 rectangles 6-1/2" x 8-1/2"
B - Cut 32 rectangles 6-1/2" x 2-1/2"
(Do notice that this fabric is directional; it has pinstripes. Keep your eye on the direction of the stripe as you cut.)
C - You already have cut these star points as squares. You need 64.
D - Is the border corner squares, finishing to 6" square. Cut 4 of these from the dark fabric 6-1/2" x 6-1/2"
Stitching the Border

Add the C pieces to the B rectangles as you did in the sashing by stitching then cutting as shown above. You need only two C triangles for each of the B's.

Make 32 of these border units B.
For the left side border join 7 rectangles A
alternating with 8 border units B.
The star points B go one either end.
The side borders should measure 72-1/2" long by 6-1/2" wide with seams.
Do the same thing for the right side.

Add the side borders to finish out the stars.
For the top border stitch a strip
that begins and ends with a D square
and alternates 8 B units with 7 A rectangles.
This strip should measure 84-1/2" with seams.
Repeat for the bottom border.
Add the top and bottom borders .
And give yourself a pat on the back.
Becky, Your quilt is beautiful! Love your fabrics, colors and fussy cuts. You are so talented. I am still playing with my blocks and trying to lay them out in some reasonable order. LOL
ReplyDeleteGorgeous Becky! Well done!!! Thank you again Barbara! Also for posting the info for this layout. The star cornerstones really sparkle in these fabrics!
ReplyDeleteBecky's finish is beautiful. i wish i had thought of that treatment for the border star when i used this set for my Civil War quilt. I didn't like the partial star either but couldn't work out how to take them out to the border and so only did the stars on the inner sashings and used a shark tooth or is is Dogs tooth first border. It may however have made the whole quilt too big as i used a wide border print as a second border... I'll save this for another time Thank you Barbara for taking us on another interesting journey. My blocks are not finished but i do hope to get back to them soon
ReplyDeleteThanks to Barbara for making my quilt look good and for writing all those directions. I'd like to add that I never plan a quilt from start to finish before I begin stitching. These weekly blocks were fun to make and I never looked beyond the block I was making - I just knew that somehow they would all look good together in the end.
ReplyDeleteI liked the size of the quilt and didn't want to over complicate it with something that would make it too big, so I kept with Barbara's recommended 2" sashing for both quilts. Adding the star cornerstones to this quilt added an extra design element, which I liked; although, had I planned to do this from the beginning, I might have made some different fabric choices in the corners of the blocks. (Some star points are lost).
The square quilt also allowed me to use two fabrics in the sashing to create yet another ever so subtle effect - alternating rounds of fabric from the center. You may barely notice it, but I think it adds to the quilt!
As of now it is unquilted, waiting for a turn in my floor quilting frame where I'm working on my Quintal Flower Vase quilt, but it could end up being machine quilted. I have no idea how to quilt it, but when the time comes, the answer will, too!
Thank you, for all the nice comments about my quilt. You have made this a delightfully fun project, and Barbara taught us so much.
Thank you for this project! I've been stitching and selecting fabrics with sweet memories of my grandmother, who always talked about the importance of voting. I now understand - she was a teen in 1920.
ReplyDeletebravo Becky, your quilt is "superbe" I love the star cornerstones; beautiful work, thank you Barbara to share all.
ReplyDeletefriendly from France
thank you for this tuto because I love your quilt and the details of borders and I want to use these stars on the borders too !!! so thank you +++ and BRAVO c'est un trés beau quilt !!!
ReplyDeleteEven prettier! I loved the green and this one is also gorgeous.
ReplyDelete